Showing posts with label Azure. Show all posts

Monday, 18 March 2019

Azure billing, cosmosdb, a tale on monitoring costs

Azure billing, cosmosdb and a tale on monitoring costs


I found an extra MSFT line item on my credit card, for a few dollars, not too much but enough for a nice lunch out. Not sure how I missed it. I did have cosmosdb from the free trial running at 100 RU/s and I think the trial ended. So looking at my invoice I could momentarily see nothing as at one point it was saying resource not available, but since corrected itself.

Account Subscription billing data

On the summary page, a link to the Version 1 downloadable data throws me an error "https://account.azure.com/Error/404" 

Clicking on "Download invoice" confirms "Azure Cosmos DB 100 RU/s AU East"

By the way, clicking the downloadable CSV option Version 2- Preview results in a file with plenty of info and I could tell which resources at a high level and over the period.

Subscription cost analysis

The cost analysis chart shows me how cosmos was chewing through dollars since 01 Feb. Useful but tells me I've now paid way more than a nice lunch.

Uh, Deleted

Easy, I've deleted the cosmosdb instance. I've also opted in to my emails to other email accounts because this one slipped through and the billing invoice was missed.

Cost optimisation - you must monitor all costs in your cloud consumption and determine if the service you are consuming is at the right tier or can be downscaled, or in this instance uh, deleted.

Cheers
Quintes
Togaf 9 Certified Architect
Professional Scrum Master I (PSM I) Certified

Connect with me on LinkedIn or Twitter

Wednesday, 21 February 2018

Azure Functions and Azure Active Directory B2C - part 2 - postman

Azure Functions and Azure Active Directory B2C (Part 2) - postman


In my previous post I setup an Azure function and B2C for auth. I wanted to now quickly get postman to use a token from B2C. In retrospect probably would have been quicker to build the SPA, will try that next. Quickly, not so much, as I worked through the screens and dialogs in B2C to setup apps and scopes, mostly getting this error when trying to get a token from within Postman.

AADB2C90205: This application does not have sufficient permissions against this web resource to perform the operation.

In the Azure Portal, Azure B2C, Applications, go to the app created previously (mine was called functionsapp). Ensure that the APP ID URI is something, in my instance called is spaapp.

Then lower down in that blade find "API Access", by default it will contain "access the users profile". Under published scopes it auto filled "user_impersonation" for me.

Create a Postman application in B2C

In the Azure Portal, Azure B2C, Applications, create an app for Postman

Give it a name, Web app (Yes), Implicit (Yes), Reply URL (https://getpostman.com/postman), App ID URI (/api), Native Client (No)

Then lower down in that blade find "API Access", by default it will contain "access the users profile". Click Add, and choose the name of your other app (in my instance functionsapp) and choose the scopes. Save.

Under published scopes I had nothing.

Postman - Get new access token screen 

I typed these in:

Token name : anything
Grant: implicit
Call back url: https://getpostman.com/postman
Auth URL : https://login.microsoftonline.com/tenant.onmicrosoft.com/oauth2/v2.0/authorize?p=b2c_1_signupsignin-01
Client id: 842....
Secret:
Scope : openid https://tenant.onmicrosoft.com/spaapp/user_impersonation offline_access
Client authentication: send client credentials in body

Fail, until I got that scope and app id URI correct.

Token received!

Test the function

Test the function in the postman, and 200 OK, and the function log show my header coming through, as expected from previous post (req.headers["x-ms-client-principal-id"])

Closing

On to the front end, less time in Postman.

References

[1] https://docs.microsoft.com/en-us/aspnet/core/security/authentication/azure-ad-b2c-webapi#configure-a-sign-up-or-sign-in-policy


Cheers
Quintes


Connect with me on LinkedIn or Twitter

Wednesday, 14 February 2018

Azure Functions and Azure Active Directory B2C - part 1

Azure Functions and Azure Active Directory B2C (Part 1)


Doing some work with azure functions and need authentication so I decided to try the B2C to setup an external Identity Provider.

I used [1], [2], [3] as reference.

Create a Azure AD B2C directory 

Create a new AD B2C directory, you cannot use an existing AAD directory.

Once done you want to set up policies. Do not go to Azure AD, it's not there, search in services for "Azure B2C", open that up and possibly favourite it so it is pinned on the menu.

If you did this as I did, the directory is not linked to a subscription. You need to go through MarketPlace, find B2C and choose the "Link an existing B2C to my subscription". Wait for that process and then go back to the B2C blade and view the Identity Providers and associated policies

Policies

Setup a basic sign in / sign up policy, specifying the idP, custom attributes and claims. I'm still going to integrate with another Provider, just want a basic case to work first.


Link an app

The purpose of this step is to configure an app to use the B2C directory.

A GUID will be generated.

Go back to the Sign up / sign in policy and grab the metadata endpoint URL


Go to the Function App, Function App Settings, Networking, Authentication/Authorisation and turn on the Authentication. Select "Azure Active Directory", Choose advanced and enter the GUID generated previously as well as the metadata endpoint url.

Save and wait for the notification "Save App Auth Settings"

Test the function

Test the function in the test window, you will have a 401 Unauthorized returned with error "Authentication is enabled for the function app. Disable authentication before running the function.".

Great, so grab the function URL and paste into a private browser session. You will be prompted to enter your existing email address and password, or signup. I chose the latter, and was presented with this form, which matches the fields I want captured:

I verified the account and the function was executed successfully! (Note I used the sample http trigger, which will become my secured cosmos db function)

This XML file does not appear to have any style information associated with it. The document tree is shown below.
<string xmlns="http://schemas.microsoft.com/2003/10/Serialization/">Hello sgdfg</string>

I actually added the request headers to the response like this to test:

body: JSON.stringify(req.headers)

I get 4 headers, particularly this one, which has the display name I provided in signup. Not super useful

"x-ms-client-principal-name"

But I also get "x-ms-client-principal-id":"6f8132fc-..."

I will use that in the meanwhile, but want to exchange for claims.

Closing

It was easy enough to setup the B2C and the App, then linking a function so that the function can authenticate and authorise a user. Next is to read the claims within the function to ensure I can setup cosmos db documents per user.

References

[1] https://docs.microsoft.com/en-us/azure/active-directory-b2c/active-directory-b2c-reference-policies
[2] https://blogs.msdn.microsoft.com/appserviceteam/2016/06/22/app-service-auth-and-azure-ad-b2c/
[3] https://blogs.msdn.microsoft.com/hmahrt/2017/03/07/azure-active-directory-b2c-and-azure-functions/

Cheers
Quintes


Connect with me on LinkedIn or Twitter

Sunday, 28 January 2018

Provisioning Office 365 Services 01 - getting started

Provisioning Office 365 Services 01


I've just completed the Provisioning Office 365 Services course through edX, mostly as a result of a number of organisations asking me over the last 3 months if I had any knowledge or experience in O365.

Thus I now do, specifically using a trial for an E3 subscription to setup a basic tenant comprising Exchange Online, SharePoint Online, Office, Teams etc. I have not setup/configured InTune (noting I do have some prior experience from an solutions architect view for mobile platforms) or Skype for Business, nor intend to, as my goal was to understand the Subscription, Tenant, Domains, Email and Administration views, and hopefully get some context on Rights Management.

Creating the tenant  


It is important to note that you must select the region/country for the subscription data location AFAIK this cannot be changed.


Also choose a domain name which is onmicrosoft.com which you also cannot change - this is the default domain name associated with the subscription.

So how do I find out my tenant name /domain name and tenant ID after the fact? Open azure portal and find the Directory ID (Guid) here and the name of the tenant is the xxxxxx.onmicrosoft.com you are most likely currently logged in as when creating the subscription. Find it under Setup -> Domains if you are unsure.

While you are on the Organisation profile you may as well select the Release Track or remember to do it later if you want some users to be on the latest releases as they come out. Most likely you actually want to do this once there are some users, so moving on..

What does my subscription look like? Like the below:


Custom Domain


You'll need to setup the custom domain for your organisation before adding users. Do this from the Setup -> Domains


I'm skipping a few screens here, in the interests of not showing my settings, but after adding the domain you need to verify you own it. Do this via the TXT OR MX record option. I chose TXT and flew through it


As example of the Verification screen:


Once verified, which is super easy, you are presented with tables of the releveant DNS Entries to add. I really think the addition of the required DNS entries on screen is helpful to get you started quickly.


Users


Add a user (regular user or Administrative)


I wanted more rights, so the Roles can be edited to give me Admin, or a mixed set of Administrative roles. These are all well documented and I won't repeat the role descriptions here.


Groups

Add some groups, there are a couple of options including O365 groups, distribution lists, mail enabled security groups and security groups.


I created one called Accounts, which would be used elsewhere, and added a user or two

Closing


This is a good start - you've created the subscription, setup a custom domain, and added users and groups. If I can work through my other thoughts before my trial ends I'll put them up here so that I can remember, and perhaps they are useful to someone else.

Cheers
Quintes


Connect with me on LinkedIn or Twitter

Monday, 15 May 2017

Azure IoT Hub connect error from node cannot read property 'write' of null

Azure IoT Hub connect error from node app - cannot read property 'write' of null in amqp libs


Quickly setting up an Azure IoT hub this evening and wiring up some node services to play with, and read the device-to-cloud messages had me stumped as I would get this error intermittently

  stream.write(buffer, callback);
        ^
TypeError: Cannot read property 'write' of null

Turns out it may be the connection string I was using

Connection String causing timeouts  


So I was defaulting to this format

HostName=somewhere.azure-devices.net;SharedAccessKeyName=iothubowner;SharedAccessKey=<yours>

This would cause the error above intermittently, and I wanted to resolve it.

Turns out you can use another connection string format:

Endpoint=sb://yourshere.servicebus.windows.net/;SharedAccessKeyName=iothubowner;SharedAccessKey=;yours;EntityPath=yourEntityPath;

To find these values, go into Azure, go to your IoT hub, Messaging, Endpoints and click on the Events endpoint below:


A properties window will appear.

The Event Hub-compatible name goes in the yourEntityPath value.

The Event Hub-compatible endpoint is where you would enter the Endpoint.

I found the problem and resolution here. I haven't encountered the error "Cannot read property 'write' of null" again.

IoT is way more fun than the old days when I used to send frames down the serial port, using c++, or getting values from a PLC or a weigh bridge. Probably even more fun than the Win SC API. But working with those devices is always good fun.

Cheers
Quintes

Connect with me on LinkedIn or Twitter

Saturday, 17 December 2016

Azure Logic Apps and Enterprise Integration Tools quick look part 3 - setup


Azure Logic Apps Enterprise Integration Tools quick look part 3 - setup Azure Logic App and Integration Account


My previous posts provided a very high level overview of the Azure Logic App workflow and the steps to create a new Integration project in Visual Studio. We will now look at the setup in Azure to get all the services talking.

Create the Azure function


I created an Azure function container, and deployed a function from a template using this link

Create the Logic App


Really easy, just log into the Azure portal and create a new Logic App here. Once that's done don't do anything in the Designer, we can do that after having created and configured the Integration Account.

Create the Integration Account


The Integration Account is part of the Enterprise Integration Pack, used to store all the integration schema, maps and accounts for your specific integration requirements.


Click New -> Market Place -> Everything and search for "Integration Account". Create the account by completing all the necessarily fields.

Link the Integration Account to the Logic App

Associate the Integration Account with the Logic App to hook up all the integration bits. In your Logic App, find and configure the Integration Account under Settings

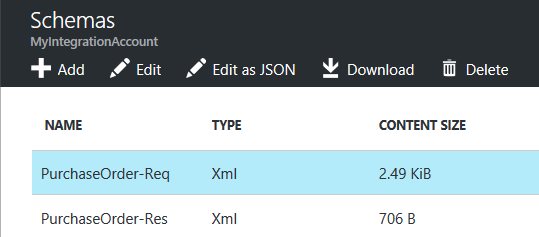
I have very quickly created Partners, Agreements, Schema and Maps for the purposes of getting the workflow running Take a look at the documentation to see what is required. In particular I used the xsd schema and the xslt map built in the Integration Project I created in part 2.


Create the workflow and link the integration artefacts


Now open the Logic Apps designer and drag in the 4 actions from part 1. Those would be an HTTP Request, XML Validation, XML Transform and HTTP Response action respectively.

Configure the XML Validation step to use the Body and specify the schema name specific to this action.


Configure the XML Transform step to use the Azure function and Azure function container you've created as well as the same Body variable, and specify the map (the resulting xslt file from the Biztalk integration project).


Finally configure the HTTP Response to return the output (The transformed XML) to the caller.


Give it a spin

Once again, trigger the workflow by submitting valid XML from either Postman or curl. Take a look at the Run result in the Overview blade of the Logic App and it should show you a successful flow through each action.

I hope the 3 part series has helped give you an idea of how to use this new technology in Azure. I continue to learn and hope that my notes here help somewhat.

@quintes


Saturday, 10 December 2016

Azure Logic Apps Enterprise Integration Tools quick look part 2 - creating the integration artifacts

Azure Logic Apps Enterprise Integration Tools quick look part 2 - creating the integration artifacts


My previous post provided a very high level overview of creating an Azure Logic App which uses the Azure Logic Apps Integration Pack to accept XML messages from an HTTP trigger. However we need the XSD and Map file to get the logic app working in terms of XML Validation and Transform.

We are going to quickly create the Integration Project using Visual Studio 2015 for the purposes of this proof of concept.

Download the Azure Logic Apps Enterprise Integration Tools


Download and install the tools from here, and let us create a new Integration Project

Create the Project


In Visual Studio, create a new project by going to New Project, Biztalk and Integration.


Once created you should have a pretty bare bones project. We'll create 2 schema files and then the actual map. The map can be created using a designer and the resulting output is an XSLT file used to perform the XML transformation.

In my instance I used an old purchase order schema found on the Microsoft website and created my own Response schema, just to get things moving.

One thing I noted is that I had added my XSD manually and it did not work on the Map designer. Perhaps the Biztalk namespace was not included and could have been the reason. Anyway, it worked fine when creating 2 new schema via the "Add item" and filling in the schema implementation as you need.


After the schema have been created, use "Add Item" to add a new Map. Choose the source schema, then the destination schema and drag and drop your transformation steps. There are many components here and some trial and error will get you what you need. I did try using the Test Map function on the map.btm file, and found that the experience could be richer.

Here is how my map looks


After you are happy that it all looks and works as expected, build the project and you should find an xslt file in the build folder. We should now have all the artifacts we need to setup the Logic App and Integration Account in Azure. We'll do that as part of a separate post.

In closing, you will need the following for the next steps:
  1. The Source and Destination schema (Mine are PurchaseOrder and PurchaseOrder_Res)
  2. The XSLT build from the Map


Move on to part 3 (coming soon) and configure your Azure Logic App to test out the Integration workflow.

Update - Part 3 here

@quintes


Monday, 5 December 2016

Azure Logic Apps and Enterprise Integration Tools quick start


A quick look at Azure Logic Apps Enterprise Integration Tools


Azure Logic Apps allows you to quickly build integration solutions using a visual designer to define the flow of the data between various cloud and on-premise data connectors. As I started to use logic apps it seem at first as if JSON was the first choice in terms of content types, but XML and integration around XML is supported using the latest Azure Logic Apps Enterprise Integration Tools.

Moving XML EDI and Integration into the cloud


Core to what I was interested in was having an endpoint provisioned to automatically receive an HTTP request with minimal effort. My next requirement was that I should be able to validate the XML against a known schema - we want to validate data before going to far. If I passed that step I wanted to either process the message or put it on the queue. Lastly, I wanted to end the workflow with a response indicating the status.

This is how it looks at a high level:


The example is trivial but meets the requirement and gives a good idea of what the Logic Apps and Enterprise Integration Tools are capable of and where it may go in the future. Support for EDI and EAI via file and XML using standard industry protocols is available. I won't delve into the specifics of message formats but the flow below should be suitable as a starting point for implementing more advanced message handling.

Using these Enterprise Integration Tools allows you to define BizTalk schema which can be used for transforming data once that data is received via a trigger. It is really impressive to see how quickly you can define the Http Request as a trigger, validate and transform the data using the Logic Apps designer as well as the Enterprise Integration Tools in Visual Studio 2015. Let us take a quick look at getting started.

Getting started


Log in to Azure and create a new Logic App if you have not already done so.

The follow-up posts will help to break this into more detail but for now you will also need
  1. An Azure function container and Azure function to run the transform. This is the serverless infrastructure, a hot topic at the moment. Imaging running just a function in the cloud, without worrying about a full API to support it, nor having to worry about the deployment and management of the infrastructure.
  2. An Azure Integration account configured and linked to the Logic App
  3. Specific agreements, partners, schema and maps to transform the XML
  4. Postman or curl to POST the requests to trigger the Logic App
With all that in place, we can start with linking a few actions together as shown earlier.

The first action is the HTTP Request, the trigger which will start this workflow when an HTTP endpoint receives a message.

HTTP Request


The Request Action mentions JSON which may through you off, but it will work perfectly fine with XML. As soon as you save the Logic App the URL should be provided. We'll use this to post our first message.

XML Validation


I've set up some schema which we will look at later, for now it is sufficient to know that the Body comes from the trigger (the HTTP Request Body) and I want to validate it against a purchase order schema (.xsd) file. If that fails the response will return immediately with an error.

XML Transformation


Create a Transform action, and configure it as necessary.


In the next post I'll show more detail on how I set this up. The goal here is to run the transform via an Azure function using a specified schema and Map to transform my demo purchase order to a response.

HTTP Response


Should the Transform succeed, I want to return the transform to the caller. Trivial, but the point is to validate the possibility. I will take the output of the previous action for the response body:


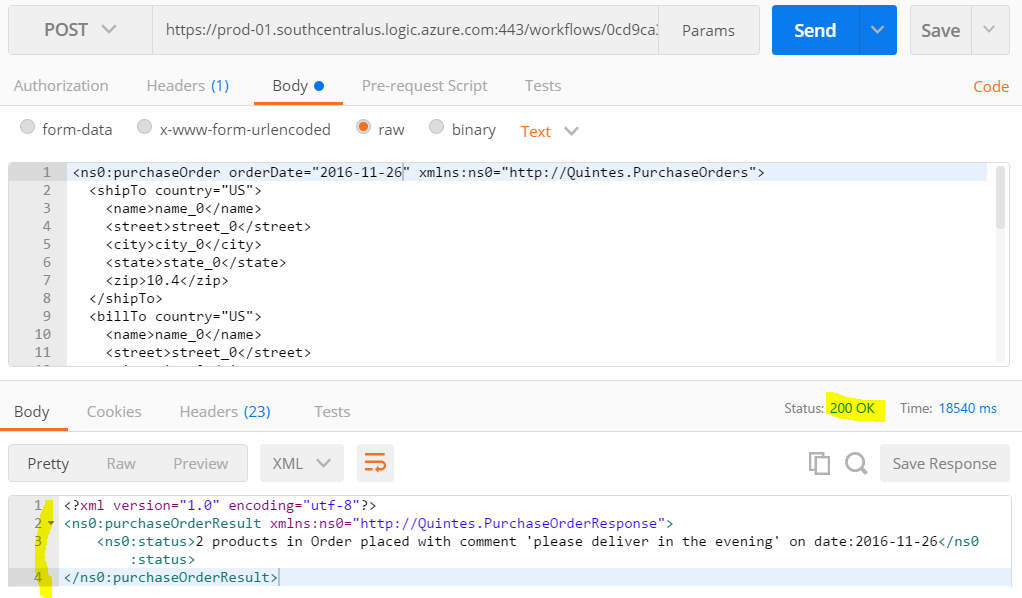
Let's try it out by making a POST via postman


The response is possibly not the best message, and it may actually need to be XML so we'll solve that another time.

Let us take a look at the Logic App and see if we can figure out where it went wrong. Go to the Logic App Overview blade, and look at the most recent error in All Runs. Here it is quite clear I couldn't pass my XML schema validation check, so I can check that off successfully.

Of course as the workflow becomes richer we can take decisions and actions based on these outputs.

If we sent a proper message what would happen then?


The response indicates a 200, that's perfect for getting started, so how did the run look?


So all actions passed and the response returned 200 OK, the response body actually contains data which came out of the Transform step:


Summary


This four step workflow is a quick proof of concept on how we could move our XML messaging capability to Azure Logic Apps and use various other Azure Services to build sophisticated solutions to Enterprise Integration.

I will follow up with more posts on the specifics of setting this up and seeing how the Logic Apps Enterprise Integration Tools can be used to define the transform. Hopefully this helps in starting to think about Enterprise Integration challenges and their solutions in the cloud.

Update - Part 2 here
Update - Part 3 here

@quintes