Showing posts with label Azure Integration Pack. Show all posts

Saturday, 17 December 2016

Azure Logic Apps and Enterprise Integration Tools quick look part 3 - setup


Azure Logic Apps Enterprise Integration Tools quick look part 3 - setup Azure Logic App and Integration Account


My previous posts provided a very high level overview of the Azure Logic App workflow and the steps to create a new Integration project in Visual Studio. We will now look at the setup in Azure to get all the services talking.

Create the Azure function


I created an Azure function container, and deployed a function from a template using this link

Create the Logic App


Really easy, just log into the Azure portal and create a new Logic App here. Once that's done don't do anything in the Designer, we can do that after having created and configured the Integration Account.

Create the Integration Account


The Integration Account is part of the Enterprise Integration Pack, used to store all the integration schema, maps and accounts for your specific integration requirements.


Click New -> Market Place -> Everything and search for "Integration Account". Create the account by completing all the necessarily fields.

Link the Integration Account to the Logic App

Associate the Integration Account with the Logic App to hook up all the integration bits. In your Logic App, find and configure the Integration Account under Settings

I have very quickly created Partners, Agreements, Schema and Maps for the purposes of getting the workflow running Take a look at the documentation to see what is required. In particular I used the xsd schema and the xslt map built in the Integration Project I created in part 2.
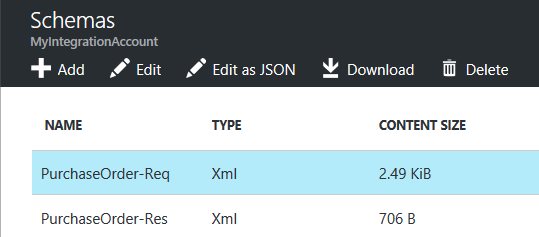

Create the workflow and link the integration artefacts


Now open the Logic Apps designer and drag in the 4 actions from part 1. Those would be an HTTP Request, XML Validation, XML Transform and HTTP Response action respectively.

Configure the XML Validation step to use the Body and specify the schema name specific to this action.


Configure the XML Transform step to use the Azure function and Azure function container you've created as well as the same Body variable, and specify the map (the resulting xslt file from the Biztalk integration project).


Finally configure the HTTP Response to return the output (The transformed XML) to the caller.


Give it a spin

Once again, trigger the workflow by submitting valid XML from either Postman or curl. Take a look at the Run result in the Overview blade of the Logic App and it should show you a successful flow through each action.

I hope the 3 part series has helped give you an idea of how to use this new technology in Azure. I continue to learn and hope that my notes here help somewhat.

@quintes


Saturday, 10 December 2016

Azure Logic Apps Enterprise Integration Tools quick look part 2 - creating the integration artifacts

Azure Logic Apps Enterprise Integration Tools quick look part 2 - creating the integration artifacts


My previous post provided a very high level overview of creating an Azure Logic App which uses the Azure Logic Apps Integration Pack to accept XML messages from an HTTP trigger. However we need the XSD and Map file to get the logic app working in terms of XML Validation and Transform.

We are going to quickly create the Integration Project using Visual Studio 2015 for the purposes of this proof of concept.

Download the Azure Logic Apps Enterprise Integration Tools


Download and install the tools from here, and let us create a new Integration Project

Create the Project


In Visual Studio, create a new project by going to New Project, Biztalk and Integration.


Once created you should have a pretty bare bones project. We'll create 2 schema files and then the actual map. The map can be created using a designer and the resulting output is an XSLT file used to perform the XML transformation.

In my instance I used an old purchase order schema found on the Microsoft website and created my own Response schema, just to get things moving.

One thing I noted is that I had added my XSD manually and it did not work on the Map designer. Perhaps the Biztalk namespace was not included and could have been the reason. Anyway, it worked fine when creating 2 new schema via the "Add item" and filling in the schema implementation as you need.


After the schema have been created, use "Add Item" to add a new Map. Choose the source schema, then the destination schema and drag and drop your transformation steps. There are many components here and some trial and error will get you what you need. I did try using the Test Map function on the map.btm file, and found that the experience could be richer.

Here is how my map looks


After you are happy that it all looks and works as expected, build the project and you should find an xslt file in the build folder. We should now have all the artifacts we need to setup the Logic App and Integration Account in Azure. We'll do that as part of a separate post.

In closing, you will need the following for the next steps:
  1. The Source and Destination schema (Mine are PurchaseOrder and PurchaseOrder_Res)
  2. The XSLT build from the Map


Move on to part 3 (coming soon) and configure your Azure Logic App to test out the Integration workflow.

Update - Part 3 here

@quintes